
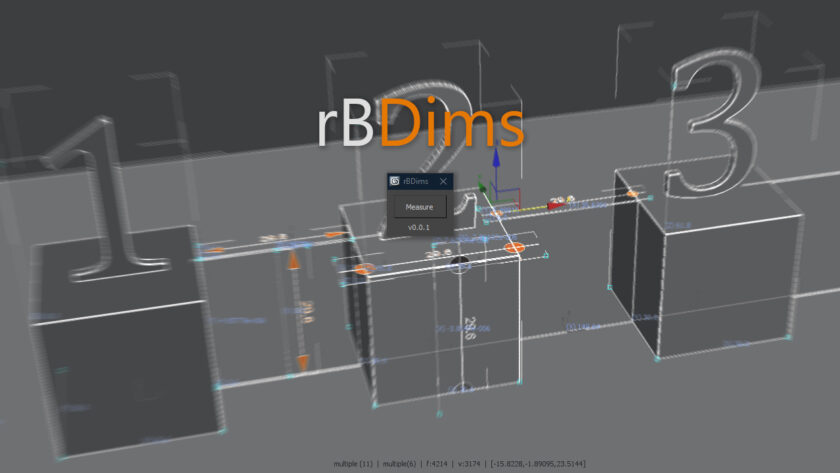
Tool for measure object(s). Skip to v0.0.7 update.
There are 4 methods available via rightclick “Measure” button. Methods 1 to 3 use Viewport Drawing methods. Method 4 is simplified AutoCAD like linear dimension.
1. Measure
- Select object(s) click “Measure”, will measure each selected object dimension.
- Select objects Shift+Click “Measure”, will measure selected objects dimension.
- Select objects Control+Click “Measure”, will measure distance between objects pivot. If group(s) selected, will only get its grouphead and discard its member.
2. Distance
This tool measure distance between picked points. Shift+Click to clear measured distance.
3. Dimension
Create AutoCAD like dimension. There are some settings you can use by rightClick “Dimension” > “settings”.
For best result, use this tool in non perspective/camera/ortho, otherwise dimension might rotated depend on your viewport rotation.
Dimension normal determined by the order of picked points (ie: left to right).
You can switch to different methods anytime by rightclick and select menuitem.
4. VP Statistic
Run persistent statistic on selected objects. A confirmation box appear on first run, whether to keep stat in current session of 3dsMax or not.
- Click “VP statistic” will show selected objects count (or name, if single object selected), selected objects material count (or material name, when only 1 material assigned to selected object(s)), total faces, total vertices and center selection coordinate (or pivot, if single object selected).
- Shift+Click “VP statistic” will show selected object(s) name and pivot coordinate.
- NEW in v0.0.2: VP statistic setting rollout to choose what stat to display in viewport
1,2,3 methods are activated at first button click. The second click button (ie: when they are active) will deactivate/switch the method. Except for the “VP Statistic” which have option to leave the stat persistent in 3dsMax session.
Update: v0.0.7 (00:46 4/30/2023)
Rewritten and added more functions to the tool. Most keyboard shortcuts also changed to suit the additions and needs a little adaptation from previous version. Read the button tooltips carefully.
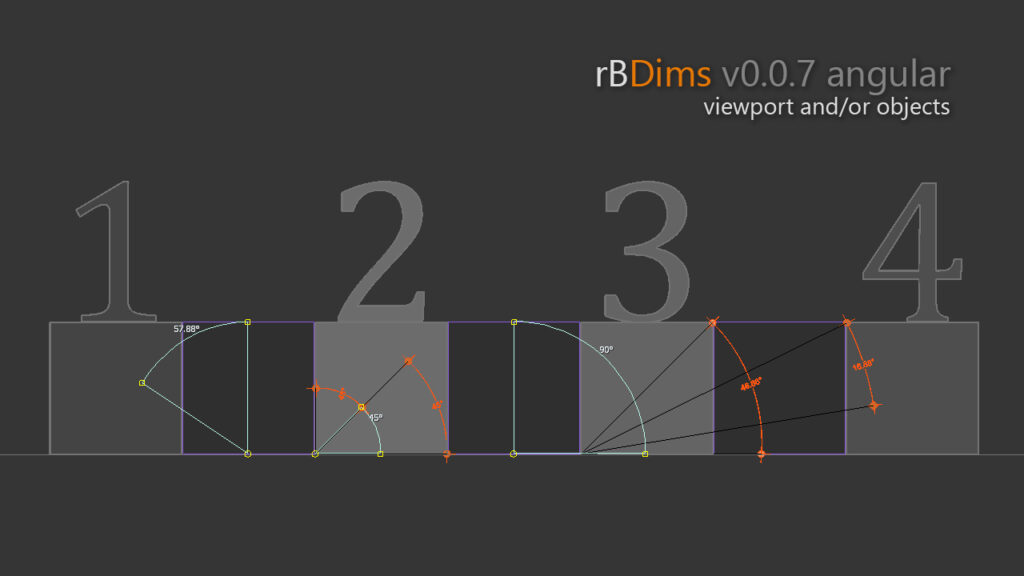
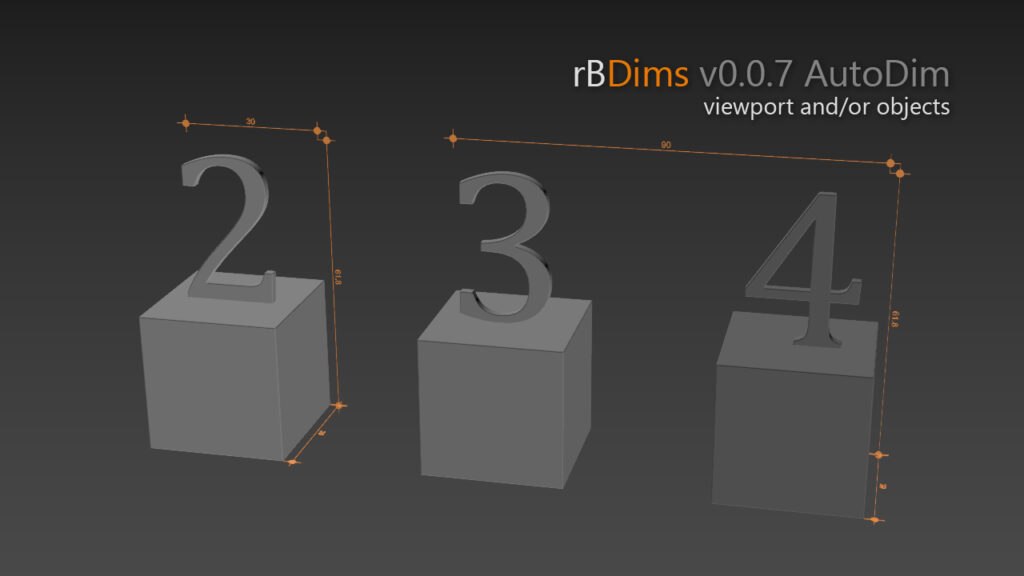
Most important update features are Angular dimension (work both as viewport drawing or objects) and Auto dimension
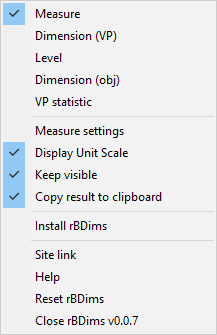
RC menu explained:
This menu is accessible from rightclick UI. The first 5 rows are the methods used (same as previous version), except the “Distance” which was replaced by “Dimension (VP)” and new “Level” addition, to measure Z level (or coordinate by Shift+click) on any surface/object.
Next are general settings:
- The first <.. settings> dynamically change upon method selection changed like previous version.
- Display Unit Scale: Will produce dimension with Unit Scale like 0.2m instead of 20.0
- Keep visible: New feature, will display all measurement results regardless current method. On previous version, only current method measurements will be displayed . This switch will override and display all measurements by default and it may cluttered your viewport (yikes!).
- Copy result to clipboard: Copy the measurement value to clipboard. After any measurement, the value will be copied to clipboard directly. Useful for collecting geometry data.
- Install rBDims: Installing macro for toolbar or shortcut, like any .mzp does. Make sure you dont move or rename script file after installation otherwise the macro will be broken! rBDims will be available under rBScript category and this menu will disappeared after installation. This installation will copy some files under #user directory (will be displayed in listener during installation)
- Site link: will launch your browser and open the page you are reading now
- Help: Since its impossible to write and update all these infos into one messagebox, there’s only so much can be written there. Always refer to this page for any question you may have.
- Reset rBDims: This menu has 2 functions, first to uninstall rbDims (it its installed, tollbar or shortcut need to be removed manually), second is to reset all script settings to default.
- Close rbDims: As it suggested, to close rBDims. Also the same with Alt+Righclick rbDims main button. All viewport data (except Dimension (obj) ) will be cleaned up. If VP statistic is active and and Keep stat for the session is false, will also remove VP statistic from viewport.
Method re-explained
Possibly redundant, but consider methods are different from previous version
1. Measure
- click: Measure selected object(s) bounding box individually. Measurement will use each local object(s) coordinate system
- Shift+click: Measure selected object(s) bounding box. Measurement will use world coordinate system
- Control+click: Measure distance between objects. This version will sort selected object by name prior calculation (instead of order of selection in previous version), so distance will start from lowest to highest object name (ex: from box001 to box002 to box033 and so on)
- Both of these two keyboard shortcuts below are the same for all methods:
Alt+click: Clear method data. This will clear data in current method. For example only measure data will be cleaned up while using Measure method - Alt+Control+click: Clear all methods data. This will delete and clean up all methods data, including Dimension (obj) objects created in scene. Be careful as there is no undo for this action
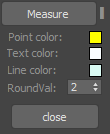
- Screenshot on the left is Measure method with Settings visible. All settings value can be changed in realtime. RoundVal is how many digit rounded displayed behind comma. When settings is activated (rightclick > .. settings), switching between method will also switching settings for that particular method
2. Dimension (VP)
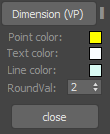
Previously called “Distance“, has been improved and added:
- click: Create linear measurement between 2 picked points. Now utilize non continuous separate measurements, instead of one continuous entity in previous version
- Shift+click: (NEW v0.0.6) Add protractor for angle measurement between 3 picked points. First picked point is center angular, 2nd and 3rd are the angles from center point
3. Level
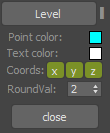
(NEW v0.0.4)
- click: Measure picked point Z pos
- Shift+click: Measure picked point coordinates. This value can be customized to show specific axis using Coords settings on the left. Require at least one axis activate, otherwise will switch to Z by default
4. Dimension (obj)
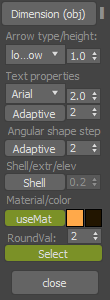
Previously called “Dimension”, instead of creating viewport object, will create dimension objects which can be rendered. Has been improved and added:
- click: Create linear AutoCAD™ like dimension between 2 picked points.
- Shift+click: (NEW v0.0.6) Create angular AutoCAD™ like dimension for angle measurement between 3 picked points. First picked point is center angular, 2nd and 3rd are the angles from center point
- Control+click: (NEW v0.0.6) Auto dimension: Measure selected object(s) bounding box. Measurement will use world coordinate system
- Control+Shift+click: (NEW v0.0.6) Auto dimension: Measure selected object(s) bounding box individually. Measurement will use each local object(s) coordinate system
Dimension (obj) Settings Explained:
- Arrow type: Arrow head type. Currently has 3 options: Short arrow, Long arrow and Dot
- Arrow height: Use 1:2 ratio to text height below for better proportion (depend on font type)
- Font type: Some font types added for cosmetics. If selected font not available in your system, it will be replaced to Arial by default.
- Text size: Font size. Because max apparently dont care about text dimension, this is not at all reflect real unit. The best thing to do for proportion is to test this value compared to arrow height value above before making final dimension object
- Text adaptive: Text adaptive interpolation. Some fonts already has really high number of vertices by default. Be careful when using this switch, as it multiply your poly count exponentially.
- Text step: Same as above. Test and check specific font you want to use before making fixed dimension.
- Angular shape Adaptive: Make adaptive arc for angular dimension
- Angular shape step: Arc step for angular dimension
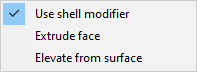 Shell/extrude/elevate switch: If inactive, all dimension objects are created in the same plane as picked points surface. This will create artifact in some renderers or even will not be visible during render. This switch will add shell modifier or extrude or simply elevate the dimension according to its normal direction to avoid the problem. To choose what mode to use, simply rightClick Shell checkbutton. The difference for each mode, is the number of poly count it produce. Shell will produce highest poly count, while elevate is the original dimension object poly count
- Shell/extrude/elevate value: Unit value of Shell/extrude/elevate switch
- useMat: Apply mutimaterial for dimension objects. There are 2 id for this material, dimension text = 1 and dimension arrow (incl line) = 2. Material will be created base on renderer used (only support corona, vray and standard material). Diffuse color for these materials can be adjusted via color picker next to this checkbutton. If useMat is off, the first color picker will be used for dimension objects wirecolor
- RoundVal is how many digit rounded displayed behind comma (this is global setting)
- Select: Whether to select dimension object after created
This Dimension (obj) is NOT realtime settings. Every change will reflect in next operation.
5. VP Statistic
Still the same as previous version with addition/change:
- Now stacked on bottom left viewport instead of one liner for better readability
- Added small function to check Open/closed spline object
Update: v0.0.3 (22:26 9/1/2021)
-. Fix bug: rotated object not measured correctly.
-. Add selected layer name for VPstat
-. Floating UI
Update: v0.0.2 (14:44 5/22/2021)
- Add Display Unit Scale setting to dimensions in all methods. You can turn it off via settings.

Note that this function rely onunits.formatValuewhich output will always return float value, so if you set settings > Precision (round value behind comma) in Dimension method to 0, value like 27.64cm which should be 28cm will be displayed as 28.0cm which is not exactly incorrect, but certainly does not follow the rule of rounding precision. - GeometryClass filter removed from selection. Now it will measure almost everything, including shape and helper classes. Should it raise any problem, report it here or on scriptspot.
- Added rollout settings for VP Statistic, intended to display only whats needed and reduce clutter in viewport.
- Added bounding box volume (BBvol) in VP Statistic.
Thank you very much for your script. Little suggestion. Can you add “system unit” after “dimension”
You’re welcome.
Script has been updated to use “display unit scale”.